Peachoid Labs
Get started.
Identify a module, associate it with a device, and control VBUS when needed. Scale to multi-unit installations as your setup grows.
Quick start
- Connect the USB-A upstream connector to the host or a suitable powered hub.
- Connect the USB device to the USB-A female port.
- Identify the module by the USB serial number shown in the control tool’s discovery output.
- Use
uhubctlon supported Linux/macOS hosts orvhfilteron Windows to command VBUS ON, OFF, or a power cycle. - Confirm the downstream VBUS state. The green LED turns on when VBUS is enabled and off when it is disabled.
Identify and control modules
Module-to-device identification
Use the module serial number to associate each physical module with the device it serves. The serial remains usable when USB topology or device paths change.
Linux and macOS
On supported Linux/macOS hosts, use uhubctl to control a module. This shell pattern reads the module's USB serial from uhubctl discovery output, resolves its current location, then controls its single port.
Run only the install command for your platform. Discovery output is shown for identification.
# 1. Install uhubctl if needed: Debian, Ubuntu, or Raspberry Pi OS
sudo apt install uhubctl

# macOS with Homebrew
brew install uhubctl

# 2. Discover the target module
sudo uhubctl
Current status for hub 1-2 [1a86:8094 Peachoid Labs PL-USB20-SW1 123456, USB 2.00, 1 ports, ppps]

# 3. Target module serial number
SERIAL="123456"

# 4. Resolve hub location by serial
HUB_LOCATION="$(
  sudo uhubctl | awk -v serial="$SERIAL" '
    /^Current status for hub / && index($0, serial) {
      sub(/^Current status for hub /, "")
      sub(/ .*/, "")
      print
      exit
    }
  '
)"

# 5. Stop if the serial number was not found
[ -n "$HUB_LOCATION" ] || { echo "Module serial not found: $SERIAL"; exit 1; }

# 6. Switch the module's single controlled port
sudo uhubctl -l "$HUB_LOCATION" -p 1 -a off
sudo uhubctl -l "$HUB_LOCATION" -p 1 -a on

# 7. Power cycle: turn off for 3 seconds, then back on
sudo uhubctl -l "$HUB_LOCATION" -p 1 -a cycle -d 3
Windows
Download vhfilter.exe from VirtualHere, then open PowerShell and navigate to the folder containing it. A PowerShell profile in Windows Terminal also works.
# 1. Install the filter driver once, then restart Windows
.\vhfilter.exe --install-filter

# 2. Discover the target module
.\vhfilter.exe --list-hubs
The following hubs are attached that support Per-Port-Power-Switching:
USB\VID_1A86&PID_8094\MSFT20123456       has  1 ports   is USB 2
                            └─ module serial: 123456

# 3. Switch the module's single controlled port
.\vhfilter.exe --switch-port 1 off "USB\VID_1A86&PID_8094\MSFT20123456"
.\vhfilter.exe --switch-port 1 on "USB\VID_1A86&PID_8094\MSFT20123456"

# 4. Power cycle: turn off for 3 seconds, then back on
.\vhfilter.exe --switch-port 1 off "USB\VID_1A86&PID_8094\MSFT20123456"; Start-Sleep -Seconds 3; .\vhfilter.exe --switch-port 1 on "USB\VID_1A86&PID_8094\MSFT20123456"
Identification-only workflows
Persistent USB identity
Even when power cycling is not needed, the module serial provides a persistent identity for the USB connection, including when a device’s COM or tty path changes—for example, from COM17 to COM23 on Windows. This is also useful for devices that cannot be uniquely identified, including multiple identical devices and devices without serial numbers.
Verify module-to-device mapping
Linux
This example uses uhubctl to resolve each module's current hub location, then follows the module's single downstream port to the mounted drive.
# Record module serials with attached drives.
# Write a distinct marker file to verify each mapping.
# No power cycle required.
MODULE_A_SERIAL="123456"
MODULE_B_SERIAL="123457"

module_mount_by_serial() {
  local serial="$1" hub_location usb_path block_device mount_point

  hub_location="$(
    sudo uhubctl | awk -v serial="$serial" '
      /^Current status for hub / && index($0, serial) {
        sub(/^Current status for hub /, "")
        sub(/ .*/, "")
        print
        exit
      }
    '
  )"
  [ -n "$hub_location" ] || { echo "Module serial not found: $serial" >&2; return 1; }

  usb_path="/sys/bus/usb/devices/${hub_location}.1"
  [ -d "$usb_path" ] || { echo "Downstream port not found for $serial" >&2; return 1; }

  while IFS= read -r block_device; do
    mount_point="$(findmnt -rn -S "/dev/$block_device" -o TARGET | head -n 1)"
    if [ -n "$mount_point" ]; then
      printf '%s\n' "$mount_point"
      return 0
    fi
  done < <(find "$usb_path" -type d -path '*/block/*' -printf '%f\n')

  echo "Mounted drive not found for $serial" >&2
  return 1
}

MODULE_A_MOUNT="$(module_mount_by_serial "$MODULE_A_SERIAL")" || exit 1
MODULE_B_MOUNT="$(module_mount_by_serial "$MODULE_B_SERIAL")" || exit 1
[ "$MODULE_A_MOUNT" != "$MODULE_B_MOUNT" ] || { echo "Module A and Module B resolve to the same drive" >&2; exit 1; }

# Write a marker file to each identified drive
printf 'Module %s\n' "$MODULE_A_SERIAL" > "$MODULE_A_MOUNT/module-$MODULE_A_SERIAL.txt"
printf 'Module %s\n' "$MODULE_B_SERIAL" > "$MODULE_B_MOUNT/module-$MODULE_B_SERIAL.txt"
This resolver uses Linux sysfs and findmnt. Confirm that both marker files appear on the expected drives.
macOS
Use uhubctl to verify each module by serial. Keep the module-to-volume mapping in your setup configuration, then write one marker file to each verified mounted path.
# Record module serials with attached drives.
# Write a distinct marker file to verify each mapping.
# No power cycle required.
MODULE_A_SERIAL="123456"
MODULE_B_SERIAL="123457"

# Verify that both modules are present
UHUBCTL_OUTPUT="$(sudo uhubctl)"
printf '%s\n' "$UHUBCTL_OUTPUT"
printf '%s\n' "$UHUBCTL_OUTPUT" | grep -F " $MODULE_A_SERIAL," >/dev/null || { echo "Module A not found: $MODULE_A_SERIAL" >&2; exit 1; }
printf '%s\n' "$UHUBCTL_OUTPUT" | grep -F " $MODULE_B_SERIAL," >/dev/null || { echo "Module B not found: $MODULE_B_SERIAL" >&2; exit 1; }

# Map each module serial to its mounted volume
mount_for_module() {
  case "$1" in
    123456) printf '%s\n' "/Volumes/Source Drive" ;;
    123457) printf '%s\n' "/Volumes/Destination Drive" ;;
    *) echo "Module serial not mapped: $1" >&2; return 1 ;;
  esac
}

MODULE_A_MOUNT="$(mount_for_module "$MODULE_A_SERIAL")" || exit 1
MODULE_B_MOUNT="$(mount_for_module "$MODULE_B_SERIAL")" || exit 1
[ -d "$MODULE_A_MOUNT" ] || { echo "Module A volume not found: $MODULE_A_MOUNT" >&2; exit 1; }
[ -d "$MODULE_B_MOUNT" ] || { echo "Module B volume not found: $MODULE_B_MOUNT" >&2; exit 1; }
[ "$MODULE_A_MOUNT" != "$MODULE_B_MOUNT" ] || { echo "Module A and Module B resolve to the same drive" >&2; exit 1; }

printf 'Module %s\n' "$MODULE_A_SERIAL" > "$MODULE_A_MOUNT/module-$MODULE_A_SERIAL.txt"
printf 'Module %s\n' "$MODULE_B_SERIAL" > "$MODULE_B_MOUNT/module-$MODULE_B_SERIAL.txt"
Use diskutil list to inspect mounted volumes. The mapping keeps the module serial as the stable key; confirm that both marker files appear on the expected drives.
Windows
On Windows, vhfilter.exe --list-hubs exposes each module's DevicePath. The example below resolves both modules by serial, follows the Windows device tree to a mounted volume, and writes one marker file to each drive.
# Run from the folder containing vhfilter.exe
# Record module serials with attached drives.
# Write a distinct marker file to verify each mapping.
# No power cycle required.
$moduleASerial = "123456"
$moduleBSerial = "123457"
$hubLines = .\vhfilter.exe --list-hubs

function Get-ModuleDevicePath([string]$serial) {
  $line = $hubLines | Select-String -SimpleMatch $serial | Select-Object -First 1
  if (-not $line -or $line.Line -notmatch '(USB\\VID_1A86&PID_8094\\[^\s]+)') {
    throw "Module serial not found: $serial"
  }
  $Matches[1]
}

function Get-ModuleVolume([string]$serial) {
  $moduleId = Get-ModuleDevicePath $serial
  foreach ($device in Get-PnpDevice -PresentOnly) {
    $currentId = $device.InstanceId
    while ($currentId) {
      $parentId = (Get-PnpDeviceProperty -InstanceId $currentId -KeyName 'DEVPKEY_Device_Parent' -ErrorAction SilentlyContinue).Data
      if (-not $parentId) { break }
      if ($parentId -ieq $moduleId) {
        $disks = @(Get-CimInstance Win32_DiskDrive | Where-Object { $_.PNPDeviceID -ieq $device.InstanceId })
        foreach ($disk in $disks) {
          foreach ($partition in Get-Partition -DiskNumber $disk.Index -ErrorAction SilentlyContinue) {
            $volume = $partition | Get-Volume -ErrorAction SilentlyContinue
            if ($volume.DriveLetter) { return "$($volume.DriveLetter):" }
          }
        }
        break
      }
      $currentId = $parentId
    }
  }
  throw "Mounted drive not found for $serial"
}

$moduleA = Get-ModuleVolume $moduleASerial
$moduleB = Get-ModuleVolume $moduleBSerial
if ($moduleA -eq $moduleB) { throw "Module A and Module B resolve to the same drive" }

Set-Content -LiteralPath (Join-Path $moduleA "module-$moduleASerial.txt") -Value "Module $moduleASerial"
Set-Content -LiteralPath (Join-Path $moduleB "module-$moduleBSerial.txt") -Value "Module $moduleBSerial"
The Windows example assumes one mounted volume per drive. Confirm that both marker files appear on the expected drives.
Automation workflow pattern
An automated host workflow can use the module as a physical recovery action for an unresponsive USB device.
- Run a health check for the camera, serial adapter, sensor, or development board.
- Resolve the controlling module by its unique serial number.
- Switch VBUS OFF, wait approximately three seconds, then switch it ON.
- Wait for USB re-enumeration and reconnect to the device’s current path.
The PL-USB20-SW1 provides the power-control action. Host software remains responsible for detection, timing, device discovery, and reconnection.
Multi-unit installation
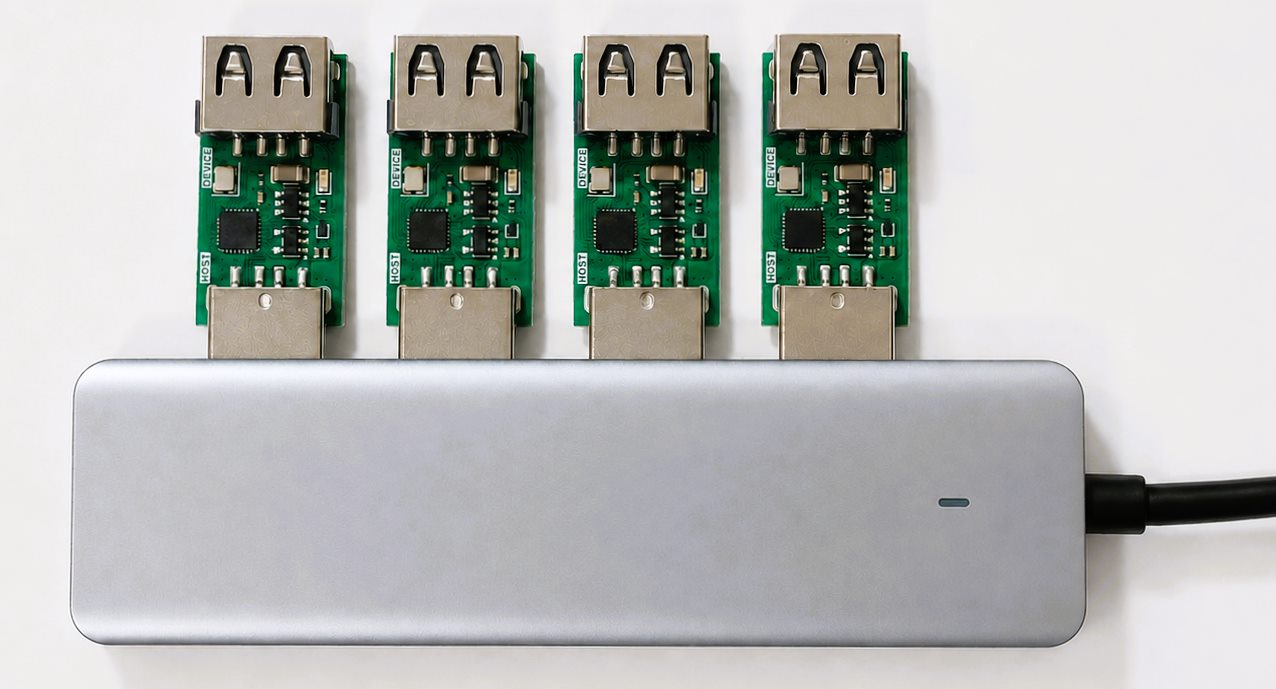
Connect multiple modules through a conventional USB hub or directly to separate USB ports on the host. Each module enumerates as an independent managed USB hub with its own unique serial number.
Record each module’s serial number with its connected device for multi-unit or automated installations.
Troubleshooting
Device does not reset as expected
Check whether the connected device has an external supply and confirm that the action targets the intended module by serial number. USB-powered peripherals normally lose power when VBUS is removed. An externally powered device may reset only its USB interface, or may remain powered entirely. Use a managed switch on the device's external DC supply when a true power cut is required.
Device loses power under load
Check available current from the upstream host or hub. Use an externally powered hub with adequate total capacity for high-current or multi-device installations.
Module is not visible to the control workflow
Verify the USB connection and host/OS support, then inspect discovery output from the installed hub-control tool.
Need help?
For product or integration questions, contact support@peachoidlabs.com.
PL-USB20-SW1 engineering files
Files are provided for development, evaluation, and OEM integration use.